Showing posts with label french. Show all posts

Sunday, July 21, 2013

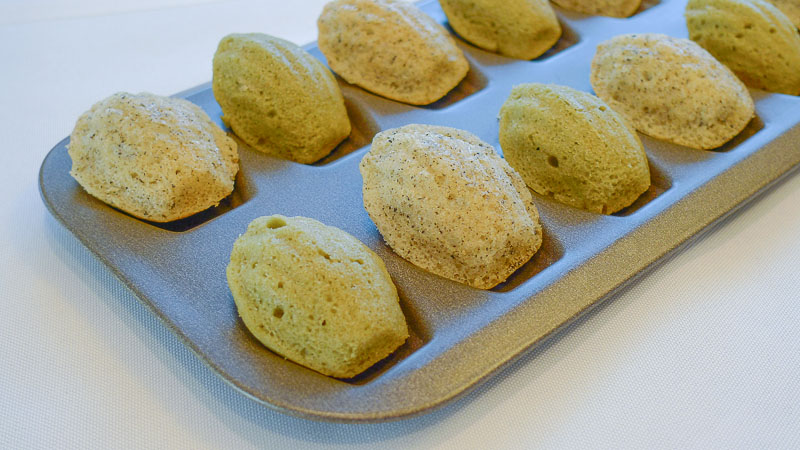
Mini matcha and earl grey madeleines

Madeleines have been on my list of things to bake for quite some time now. For some strange and incomprehensible reason, these dainty little treats have intimidated me. In my mind, the simpler the recipe is, the more difficult it is to make the treat. I guess because it is so simple to make, people become overconfident and can easily mess up. However, madeleines require such few ingredients and really are so simple to make. I don't know why I was so scared.


My brother was coming home for a day after traveling for six months, so I decided it would be nice to treat him to an afternoon tea. This was the perfect excuse for me to finally make madeleines. I also have to admit that I have been sucked into the vortex that is…matcha. Matcha is simply a green tea powder and it adds a wonderful earthy depth to anything you put it in. So for this afternoon tea, I made matcha madeleines [and also earl grey madeleines]. 


Seeing as I only have a mini madeleine pan on hand, I was forced to make mini madeleines. At first I was a bit frustrated with this, but when the madeleines came out of the oven, they were just the cutest little cakes ever. They don't have the brightest green color. In fact, I like the earthy, slightly pale green color they have. If you wanted to make them more vibrant, I suppose you could add some green food coloring. 


One more thing that I didn't do and what I would recommend for you to do is to add some milk or lemon juice to the batter; maybe about 1 tablespoon because the cakes were just a tad on the dry side. Other than that, they were delicious. The matcha flavor came through just enough to not be overpowering. The earl grey was also so floral. I think I prefer the earl grey to the matcha, but they were both delicious. If you are ever in the mood for afternoon tea or want to make use of your matcha, I highly recommend making these madeleienes. 


Matcha [and Earl Grey] Madeleines
makes approx 50 mini madeleines

Base batter
ingredient:
2/3 cup all purpose flour
3/4 teaspoon baking powder
Pinch of salt
1/2 cup sugar
2 large eggs, at room temperature
6 tablespoons unsalted butter, melted and cooled

1 teaspoon vanilla extract
--------------------------------------------------------------------------- 
 
directions:

In a medium bowl, sift together the flour, baking powder, and salt. Stir to combine.

On a stand mixer, or with a hand mixer, combine the sugar and eggs. Beat the mixture for 5-6 minutes, or until thick and pale. Once pale, add the vanilla. (At this point you would want to add about 1 tablespoon of milk or lemon juice.

Gently fold in the flour mixture into the egg mixture. Then add the melted and cooled butter. Mix until all the ingredients are incorporated thoroughly. 

Now, divide the batter in half into two medium bowls. In one bowl, add 1 1/2 teaspoons of matcha. In the other, add 2 teaspoons of finely ground earl grey tea leaves. Cover the bowls with plastic wrap and refrigerate for 3 hours. This step allows the madeleines the form their signature humps. 

After the batter has been refrigerated for long enough, preheat the oven to 400°F. Spoon the mixture into greased pans. Fill them about 3/4 of the way up, approximately 1- 1 1/2 teaspoons. Flatten the tops just slightly. If you overfill the pans, the batter will spill over and the madeleines will bake into each other. Bake the cakes for 8-10 minutes, or until the edges are just golden brown. Cool completely. Once they are completely cooled, just tap the pans onto a sheet tray and the madeleines should pop out easily. 


These little cakes are so delicious when dipped into a nice cup of hot tea. Any tea is fine. Choose your favorite. The earl grey madeleines are so wonderfully floral and the matcha madeleines are extremely rich and earthy. I really do hope you enjoy them!


As always, Happy baking!!  


Monday, June 10, 2013

Almond Financiers with Honey-Mint Poached Pears

Financiers have always reminded me of madeleines. They have that golden brown color and they look extremely spongy and moist. Often, financiers are mistaken for pastries when in fact, they are small French cakes. Typically, they are made with almond flour or powder. One key trait of financiers is that they include browned butter, which is extremely simple to make.


Financiers have a similar texture to sponge cakes. I would say that they are slightly denser and have a nice nutty flavor because of the almond flour. I also added slivered almonds which enhanced the almond flavor and added some texture to the cake. What ever you choose to add to the financiers, they always have the same five ingredients: almond flour, powdered sugar, flour, egg whites, and [browned] butter.

After thinking about it, I realized that just making financiers alone would be too boring. So I decided that I would add a little flare to them. What I did was poach some pears in honey, water and mint. The honey made the pears even sweeter and even caramelized them a bit. I think it was the perfect touch the the delicate financiers.


I adapted Pastry Pal, Irina's recipe. The recipe for the financiers is word for word, but the pears are different. Instead of rosemary, I used mint and instead of wine I simply used water. I know the wine would have added more flavor, but I didn't have any wine on hand so I had to make do. I topped the finished product with a fresh mint leaf and brushed the entire surface with syrup, which gave it a beautiful shimmer.

The final result was a beautiful honey mint poached pear almond financier. The top of the cake had a light crust and the inside was chewy but moist. It wasn't overwhelmingly sweet and the pear was perfectly tender. I would really recommend making this if you're in the mood for a delicate treat.

Honey Mint Poached Pear Almond Financier
makes approx 8-10 (4" diam., 1 1/4" high) cakes 

Financier
adapted from Irina 
ingredients:
1 stick (4 oz, or 112 g) unsalted butter
1 2/3 cups (200 g) powdered sugar
1/3 cup (42 g) all-purpose flour
1/2 cup (42 g) almond flour
4 large (about 1/2 cup, or  125 ml) egg whites

1/2 cup slivered almonds  
--------------------------------------------------------------------------- 
directions: 

Preheat the oven to 375°F

In a large bowl, stir up the powdered sugar, flour and almond flour. Pour in the egg whites and whisk the mixture until smooth. Set the mixture aside. 

In a saucepan, melt the butter over high heat and watch it melt. Keep your eye on it as you do not want it to burn. The color you are aiming for it a chestnut brown. Once you smell a nice and nutty aroma, the butter is done. It will take about 5-7 minutes. Make sure the butter does not start smoking, that's when you know it is burnt. 

Slowly incorporate the browned butter into the flour and egg white mixture. There will be some blackish milk solids at the bottom of the saucepan. Make sure not to pour that into the batter. It will make it taste bitter. Just leave that in the pan. 

Now it's time to bake the financiers. I used mini tart pans from Williams-Sonoma, but you don't have to. You can use cupcake tins or mini brioche pans. Spray the pans with cooking spray or coat them with butter. Fill the pans until halfway full. Sprinkle the slivered almonds on top. Bake for approximately 15-20 minutes or until golden brown. Let cool as we prepare the pears. 


Honey-mint poached pears
ingredients:
1 tablespoon canola oil 
4 ripe bartlett pears, peeled
1/2 cup (125 ml) honey

2-3 sprigs of fresh mint
1/4 cup water 

--------------------------------------------------------------------------- 
directions: 

Cut the pears along the four sides. Try to get most of the fruit off, cutting close to the core.

Heat a saute pan over high heat and pour in the oil once the pan is heated. Toss in the pears and allow them to sit for 30 seconds before stirring. Cook the pears for about 5 minutes. If desired, move them around to get each both sides seared. 

Once the pears have cooked for a while, add in the honey and mint. Stir the ingredients together and allow the pears to release their juices while taking in the honey and mint as well. Let them cook in the honey for about 5-7 minutes. If the edges of the pan seem to be too caramelized and start to look burnt, add some water. After about 5-7 minutes, poke the pears to test their tenderness. If they are still hard and the liquid is evaporating too quickly, add more water and honey and turn the heat to medium. Once the pears are tender (test by poking a toothpick or fork into the center), pour them into a sheet tray and let cool. Reserve any left over syrup.


Assembly:
Take the cooled financiers out of their pans and place them onto small doilies or onto a small plate. Cut the pears into thin strips. Place the sliced pears, in their original shape, onto a financier. Gently top each pear with a fresh mint leaf and brush the entire surface of the dessert with the left over syrup from the pears. Done. Now it's time to enjoy them. 


I do wish I had the chance to try one of these, but they were gone before I could even have a bite. The description of the cakes come from my family, but I trust them enough to say they are accurate descriptions. Either way, they look delicious, so they must taste delicious as well! 

As always, Happy baking!!

Thursday, August 9, 2012

Éclairs

After coming home from my two week adventure in Europe, I found myself craving some french pastries. Pierre Herme definitely changed me. Well, he changed the way I view baked goods, at least. My oh my were his pastries divine. I can still taste the creamy and rich Infiniment Vanille Tart. My mouth waters just thinking about it. But I know that I do not have the skills to attempt to recreate such a masterpiece, so I settled for something that was easier but equally as delicious-Éclairs!  


Regretfully, I did not have an opportunity to try an eclair in Paris. I wish that I had been able to taste an eclair from Fauchon. They have a wide selection of beautifully decorated and delicious looking eclairs. They come in all different colors, sizes, and shapes. Basically eclairs in Paris are equivalent to cupcakes in America. They're the latest craze...and I can see why. 


The most basic eclair consists of a light Pâte à choux base, a sweet and luscious pastry cream filling, and a rich dark chocolate glaze. They require a few different components but they are all fairly simple to make. I'd say the most difficult part is making the perfect pate a choux, which consists of only 4 simple ingredients- butter, water, flour, and eggs. The difficult part is making sure enough moisture is employed to create the most steam and the puffiest/hollowest pastry. It is crucial that the finished product results in a light pastry with a hollow center. 


The recipe I used comes from Raiza of Dulce Delight. I love watching all her videos and following her blog. She really knows what she's doing and is really knowledgeable about baking. Her recipes are very straightforward and simple if you follow her directions. Her recipe uses a Cream Légère. It's simply a pastry cream with whipped cream folded in to make an extremely light and airy filling. I found that it was better to make the cream the night before and leave it in the fridge to chill overnight.

Eclairs
adapted from Dulce Delight 
makes approx 15 3-inch eclairs 

Pâte à choux
ingredients: 
250g water
110g butter, cubed
pinch of salt and sugar
140g all purpose flour
3 to 5 eggs, depending on the dough's consistency (I used 4 eggs)
egg wash:
1 egg
2 tbs milk
---------------------------------------------------------------------------  
directions:

Preheat oven to 400°F. Line a baking tray with parchment paper. Set aside

In a medium saucepan add the water, butter, salt, and sugar and allow the mixture to come to a simmer. 

Once the mixture has come to a simmer, turn off the heat and add the flour. Stir and once the flour is combined, turn the heat back on. Cook the flour mixture for about 2-3 minutes or until a slight film forms on the side of the pan.

Transfer the dough into a bowl of a mixer fitted with the paddle attachment. Mix the dough on medium speed for 3 minutes to allow it to cool down. Then add the eggs one by one. (Be careful not to add too many eggs. The dough should be able to fall back into the bowl in a ribbon.)

Fill a pastry bag with the dough and pipe the eclairs (I used an Ateco#808 tip). Beat the egg and the milk in a small bowl and brush the mixture over each eclair. Bake the pâte à choux for 35-40 minutes or until they are golden brown. After the 40 minutes, turn off the oven, and keep the oven door open using a wooden spoon. Let the eclair shells sit in the oven for another 15-20 minutes.


Cream Légère
makes enough to fill approx 15 eclairs
ingredients:
500g milk
1/2 vanilla bean, split lengthwise and scraped or 1 tsp vanilla extract
4 egg yolks
75g sugar
2 tbsp flour
2 tbsp cornstarch
100 ml cold heavy cream
---------------------------------------------------------------------------
directions:
In a medium saucepan, bring the milk and vanilla to a simmer. Cover and let sit for 10 minutes. 

Meanwhile, in a medium bowl, beat the egg yolks and sugar until the mixture becomes light and fluffy. Add the flour and cornstarch. 

Pour some of the hot milk mixture over the egg mixture and stir. This step is called tempering. Pour the egg mixture back into the saucepan and cook everything until the mixture has thickened, about 3-4 minutes. 

Transfer the cream into a small bowl. Cover the cream with plastic wrap directly on top so a skin does not form. Chill the mixture for 4 hours or preferably overnight.

Right before you're ready to use the pastry cream, beat the heavy cream until stiff peaks are formed. Fold in half the whipped cream into the pastry to lighten the cream. Once incorporated fold in the remaining whipped cream. 

Chocolate glaze
ingredients:
60g bittersweet chocolate
2 tbsp heavy cream
1 tbsp honey
2 tbsp hot water
---------------------------------------------------------------------------
directions:
Microwave the chocolate and heavy cream for about 1 minute, or until melted. Incorporate the honey and water. Stir until fully combined.


Assembly:
Using a small pastry tip, poke two wholes under each eclair shell. Starting on one end fill the eclair shell until cream comes out the other hole. Then dip the eclair into the chocolate glaze. Let sit for 15 minutes until set. Serve immediately.


Happy Baking!

Friday, May 4, 2012

French Macarons

They should change the phrase to, "fourth time's the charm." That's how many times it took me to finally be able to make a decent looking macaron. For years I've been fascinated with these little french treats, but I've been too afraid to make them myself. But recently, I've been obsessed and I had to give them a try.

The perfect macaron consists of three key aspects: 
1. They must have feet! It's the key to a beautiful looking macaron. It's what makes you do a double take when you pass by a french patisserie.
2. The exterior must be crunchy and glossy! You know you have a beautiful macaron when the exterior shell has a good crunch when you bite into it. Also, they must have a nice shine to it. Food is half aesthetics....isn't it?
3. The interior should have a soft, meringue texture! A perfect macaron always has a smooth and chewy interior. It should be soft but still have a nice bite to it.


My first attempt was a total flop. The macarons were mishapen, deflated, and lacked the proper "feet." The had a nice chew inside, but the shells were cracked and they looked like they had just been through an earthquake. The next two attempts were no more successful than the first. Both times I became so frustrated that I threw the batter into the sink in rage. After the third attempt, I swore to myself that I would never make macarons again. Then came Thursday, May 3, 2012.

I spent most of the night studying macarons. I watched all the videos and learned all the proper techniques: don't over whip your egg whites, make sure to use room temperature egg whites, weigh your ingredients, add a pinch of cream of tartar into your egg whites to help stabilize them, let your piped shells rest for 1 hour to create a proper coating. After having watched all those tutorials, my will power had diminished. I had to try one more time. I knew that I would succeed this time...I simply had to.

The final result? Why don't you see for yourself?


I finally made beautiful macarons with feet, a crispy exterior, and a chewy interior. They had great flavor and were the perfect late-night snack. I was so happy that I literally took a victory lap around my kitchen.

If you're a brave soul and you want to try to make your own macarons, here's the recipe. I used Dulce Delight's recipe:


Hazelnut macarons with Nutella buttercream
adapted from Dulce Delight

Shell
ingredients:
55g raw almonds
55g raw hazelnuts
200g confectioners sugar
2 tbsp cocoa powder
90g egg whites- aged for 2 days in your refrigerator 
pinch of cream of tartar
40g granulated sugar
--------------------------------------------------------------------------
directions:

Grind the almonds, hazelnuts, confectioners sugar, and cocoa powder in a food processor. Pulse until everything is finely ground and well mixed.

Using a stand mixer, whip the aged egg whites until frothy. Once they become frothy, add a pinch of cream and tartar and gradually add the granulated sugar. Once all the sugar has been added, whip the egg whites until you reach stiff peaks. (You know you've reached stiff peaks when none of the whites fall out of the bowl if you put the bowl over your head)

Sift your dry ingredients into the egg whites. Then, gently fold the ingredients together. (You don't have to be extremely careful at this stage. You want to get some of the air out, but not enough to deflate the whole mixture.) This step is called macaronage. To see if you've mixed enough, put a dollop of the mixture onto a clean plate. If the batter spreads out within 10 seconds and doesn't have a peak, it's ready. If there is still a peak, keep mixing the batter for another 10-15 seconds.

Once your mixture is thoroughly mixed, pour the mixture into a piping bag. Pipe either 1 or 1.5 inch rounds onto a baking sheet lined with silipat or parchment paper.

The next step is crucial!
Let your piped macarons dry at room temperature for 1 hour. This step ensures that your macarons get a crispy exterior and form those lovely feet.

50 minutes into the drying process, preheat your oven to 300 degrees F.

After 1 hour, bake your macarons for 15-20 minutes. You want the shells to look glossy and opaque. Cool completely.


Nutella buttercream
ingredients: 
1 stick butter, softened
2 cups confectioners sugar
1/4 cup nutella
--------------------------------------------------------------------------
directions:


In a stand mixer, whip the butter until smooth. Slowly add the confectioners sugar. Whip until nice and airy, about 5 minutes. Add the nutella and keep whipping until the color is light brown and airy, about 3 minutes on medium speed.

Assembly: 
Fill the one shell with about 1 tablespoon of nutella buttercream. Sandwich another shell on top, twisting slightly as you go.

Viola! You have now made delicious french macarons!


Now...if your macarons don't come out as expected the first time, I advise you to never give up. It takes time and practice to perfect these little treats. Never get discouraged...and never have a mental break down like I did.

I really hope you give this recipe a try and I hope you're happy with the results.

Happy baking!